Quick View POV
View the available dimensions. Time and Account are used by default, but can be moved and replaced with other dimensions.
|
Button |
Description |
|---|---|
|
Select Member |
Click Select Member in the Quick View POV to select a dimension member. |
|
Filter
|
Click filter to launch the Member Filter Builder and query several Dimension Members at once. Click Apply in the Member Filter Builder to see the results prior to closing the Builder dialog. See Member Filters in Cubes for more details on Member Filters and how to use the Member Filter Builder. |
|
Column Dimensions |
The dimensions for the column view are defined and you can drag and drop from the Quick View POV or Row Dimensions. |
|
Row Dimensions |
The dimensions in the row view are defined and you can drag and drop from the Quick View POV or Column Dimensions. |
|
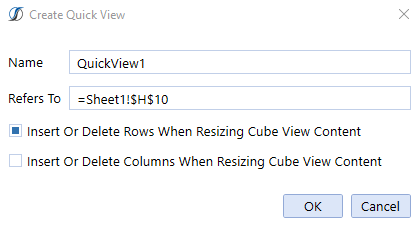
Create Quick View
|
When the window opens, you can enter a name or select the default. Refers To is where the quick view shows in the Excel sheet. You can insert or delete rows or columns so when it’s created, existing fields aren’t overwritten.
|
|
Rebuild Quick View |
This will Rebuild a Quick View when using the Type in feature of Quick View. When additional Members are added to or extended past the range of the existing Quick View, highlighting those news fields along with selecting the button will rebuild the Quick View and add the new Members and data accordingly.
|
|
Rename Selected Quick View |
Select a Quick View and choose this icon to delete it. |
|
Delete Selected Quick View |
Select a Quick View and choose this icon to delete it.
|
|
Edit Quick View Options
|
The following properties appear once the icon is selected. Insert Or Delete Rows/ Columns When Resizing Cube View
Maximum Number of Rows/Columns
Row Header/Columns Header Text Types
Name
Description
Name and Description
Short Description
Suppress Repeating Member Names
Primary, Upper Left, Row Header, Column Header Styles
Data Style
Suppress Invalid Rows/Columns
Suppress NoData Rows/Columns
Suppress Zero Rows/Columns
Use Suppression Settings on Parent Rows/Parent Columns
|
|
Refresh Quick View |
This icon will refresh the data set.
|
|
Undo Changes and Revert to Prior Quick View Settings |
Clicking on this icon will undo any changes not wanted. OneStream will remember up to 100 previous actions
|
|
Redo Quick View Settings |
This will redo deleted changes. |
|
Select Member |
This icon can be used to Search for Members within a Dimension Type and Dimension. This allows the resulting Members to be displayed in the Hierarchy and multi-selected Members can be added to a Quick View. See more details below on the use of this button within Quick Views |
|
Keep Only |
This icon will clear everything except the selected items. Tip: Use the control key to keep more than one item. |
|
Remove Only |
|
|
Next Level |
This icon has the same function as double-clicking on a row. It will go down to the next level. |
|
All Tops |
This icon will go back to the Tops of the Dimensions.
|
|
Parents |
|
|
Children |
|
|
Base |
This icon will go to the Base of the particular branch.
|